|
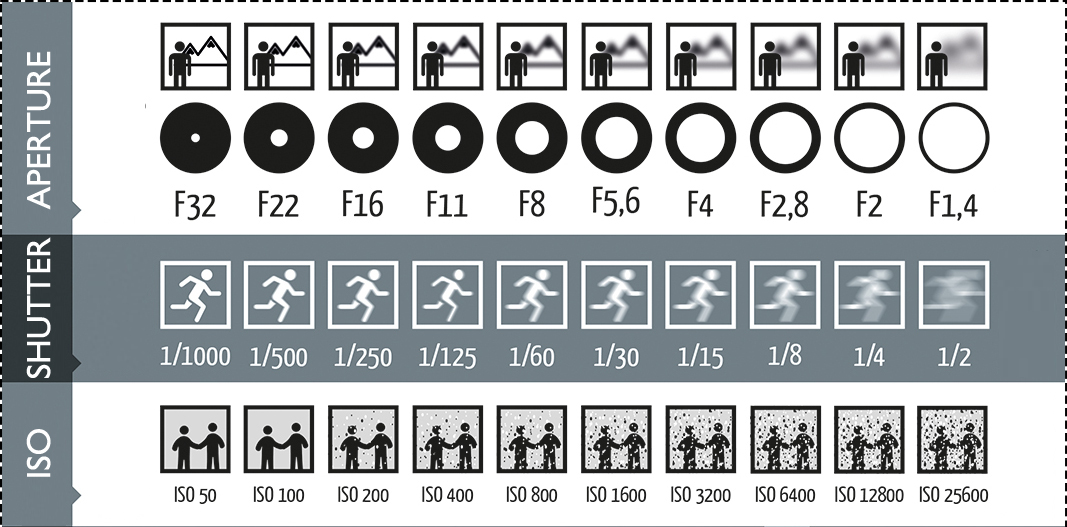
Welcome, once again to our basics of product photography blog. As in our previous blogs, we have covered aperture and shutter speed respectively. Now, it’s time to discuss about the third and also one of the important terminology of photography. Which is ISO, it is little different from aperture and shutter speed. Instead of controlling, how much light gets to the sensor, it controls how much light the sensor needs to make the image. The higher the ISO, the more sensitive to sensor is to light. Suppose for a moment that light enters your camera in neat little cubes, and let’s consider that there are 48 cubes that it takes to get a correct exposure at ISO 200. If you set the camera to ISO 400 instead, the sensor only needs half as much light.That is 24 cubes. Set it to 800 and again, it’s twice as sensitive and you only need twelve cubes. 1600 needs half as much light again, and 3200 needs half as much light as that, and so forth. So, when you set the camera to high ISO, you can take pictures when there is a lot less light. Pretty simple.
Now, for beginners those who are looking to perform product photography in Gurgaon, product photography in Noida or Product photography in Delhi must be going through one question in their mind that why not we just shoot at high ISO all the time? Because the higher you set the ISO, the more digital noise or film grain will be visible. Now, after having discussed about all the three basic terminologies of e commerce photography or general photography one can say. The main agenda here is to understand that how these three, aperture, shutter speed and ISO works together? It could be understood via an example, suppose we set the camera settings at f/2.8, ISO 400, and for simplicity’s sake the shutter speed is 1 second. And if we take a picture at these settings of camera, the exposure is just right. Now, what if a product photographer want more depth of field?We set the aperture in such a way so, that it is one notch smaller. But what happens when we take a picture? Now, only half as much light will get to the sensor and the picture which will come out to be under exposed. This can be resolved by making the shutter stay open for twice as long, two seconds in this case. And if we cut the amount of light in half with the aperture again by setting it down to f/5.6, we can make up for it by doubling the shutter speed again, to 4 seconds. There is one other option. Let’s go back to the settings we started from, now the alternate would be to change the ISO instead of shutter speed and we can leave it to 1 second and can change the ISO to 800. Now, the sensor will need only half as much light, which is perfect, because only half as much light is getting through the lens, and if set down the aperture to another notch to f/5.6, we can make up for it by changing the ISO to 1600. At this point, the picture be very much clear about how these three factors relate to each other. If you change any of the settings in one direction, you have to make up for it by moving either one of the other two in the opposite direction. So, if we set the ISO up one notch to 1600, we can up for it by setting shutter speed down one notch to 250th of a second. If we move the ISO down two notches to 400, we can make up for it by opening up the aperture two notches to f/4 and you can split the change between two of the other settings. So, in this way, all the three basics of product photography Delhi have been covered in our all the three blogs now. Bring It Online - www.brinitonline.in www.facebook.com/bringitonlinein www.youtube.com/user/bringitonlinein www.plus.google.com/+BringitonlineIn www.twitter.com/bringitonlinein +91 9599693769 Related Searches: Selling online on Flipkart , freelance photographers delhi , photography for branding , best photography services in delhi, seller.snapdeal.com Comments are closed.
|
- Home
-
PHOTOGRAPHY SERVICES
- Product Photography
- Fashion Photography
- Fashion Campaign Photoshoot
- Fashion Editorial Shoot
- Male Model Photography
- Kids Clothing Photography
- Lingerie Photoshoot
- Jewellery Photography
- 360 Degree Photography
- Ghost Mannequin Photography
- Bags Photography
- Corporate Headshots
- Product Video Maker
- Footwear Photography
- E-Commerce Video Production
- Rent A Studio
- Hire Models
- Contact

